Build an AI Rock, Paper, Scissors Game: Step-by-Step Python Tutorial | AI Valley Tricity
Welcome to AI Valley, the premier destination for next-generation tech education in the Tricity area! Whether you join our state-of-the-art labs in Zirakpur or Chandigarh, our students build incredible, futuristic projects like this every single week. Computer Vision and Artificial Intelligence might sound like science fiction, but they are incredibly fun, intuitive, and easy to learn once you understand the basic building blocks.
Today, we are going to dive deep into the fascinating world of AI by building a Python game that uses your computer's webcam to track your hand movements. You will be able to play a classic game of Rock, Paper, Scissors against an artificial intelligence that literally "sees" your real-world hand gestures. Let's start coding!
---
🎯 What You'll Build
You are going to build a fully functional, AI-powered Rock, Paper, Scissors game from scratch. Your computer's webcam will act as the "eye" of the system, reading your real-life hand gestures in real-time.
If you make a "Rock" fist, a "Paper" flat hand, or "Scissors" fingers, the AI will accurately recognize your hand skeleton, log your choice, choose its own random move, and dynamically keep score on your screen! This is exactly the kind of interactive, real-world project students build during their advanced weekend tech classes at AI Valley. It combines game design, logic programming, and cutting-edge machine learning.
📋 Prerequisites & Materials
Before we dive into the code, let's make sure your development environment is ready.
- Python 3.8 to 3.11: Ensure a compatible version of Python is installed on your computer. (Note: MediaPipe sometimes struggles with brand-new Python releases, so 3.10 or 3.11 is the sweet spot).
- Code Editor: We highly recommend Visual Studio Code (VS Code) or PyCharm for their excellent Python support and terminal integration.
- A Working Webcam: A built-in laptop camera or a standard external USB webcam will work perfectly.
- Local Lab Access: Don't have a webcam or a fast enough laptop? Don't worry! Visit AI Valley's Chandigarh or Zirakpur labs where high-end laptops, cameras, and robotics kits are provided for all our students.
Installing Required Libraries
You will need two powerful open-source libraries: opencv-python for camera access and image processing, and mediapipe for Google's machine learning hand-tracking models.
Open your code editor's terminal or your computer's command prompt and run the following command:
---
Step 1: Setting Up the Computer Vision Feed
The first step in any computer vision project is to get the webcam up and running. If you want to take the best coding classes for kids in Chandigarh, mastering the cv2 (OpenCV) library is a brilliant place to start. OpenCV is the global industry standard for image and video processing.
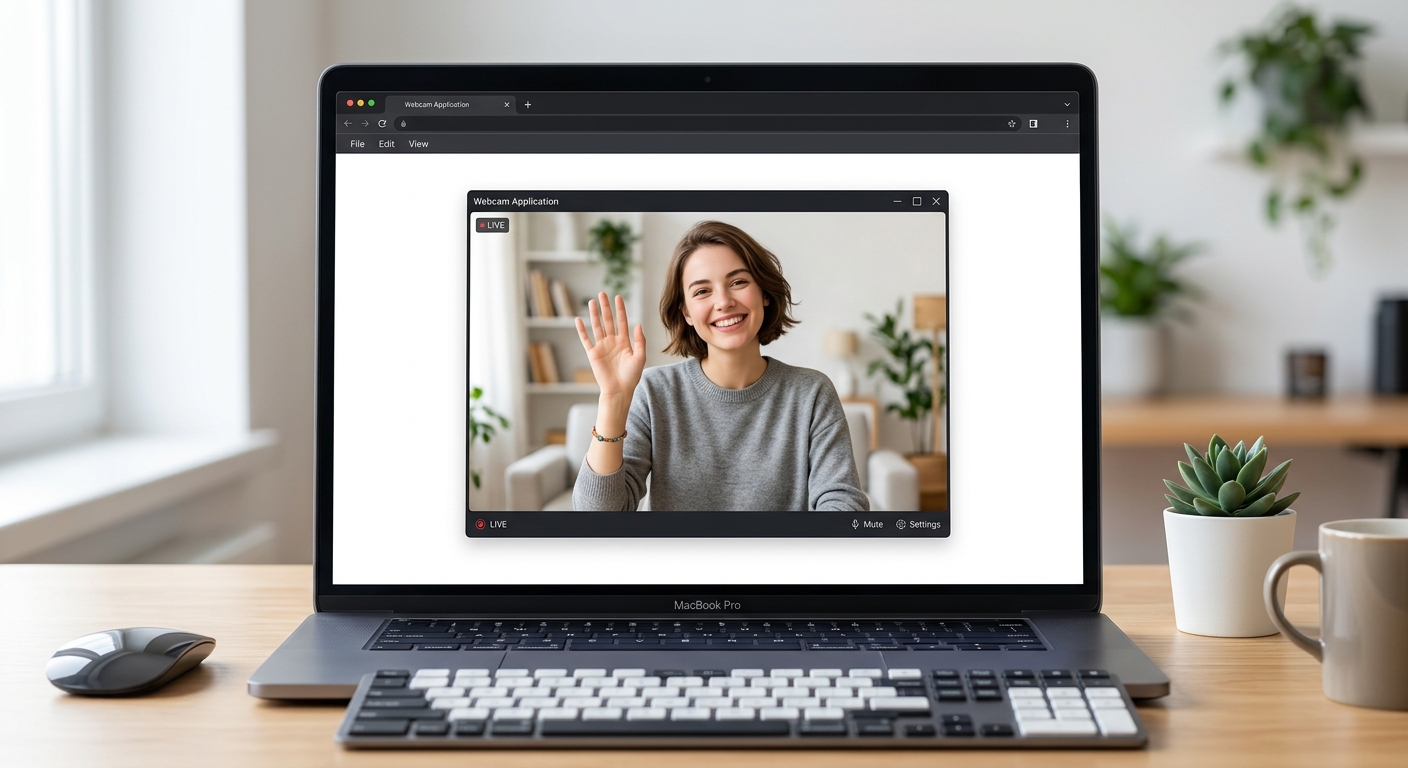
A clean screenshot of a simple webcam feed opening on a computer screen showing a person waving.
Create a new Python file called ai_game.py and add the following code:
🧠 Expert Insight: What is happening here?
We import OpenCV and tell it to capture video from camera index0. We enter an infinite while loop that continuously grabs new image frames at 30+ frames per second. We use cv2.flip(img, 1) to mirror the image—otherwise, moving your hand to the left would appear to move to the right on screen, which is very disorienting! Pressing 'q' breaks the loop and safely releases the camera.---
Step 2: Integrating AI Hand Tracking
Now we need our program to actually "see" and understand hands. For this, we use Google's MediaPipe library. This is exactly why our best coding classes for kids in Mohali focus on teaching modern, industry-standard libraries—they allow young developers to build professional-grade AI systems with just a few lines of code.
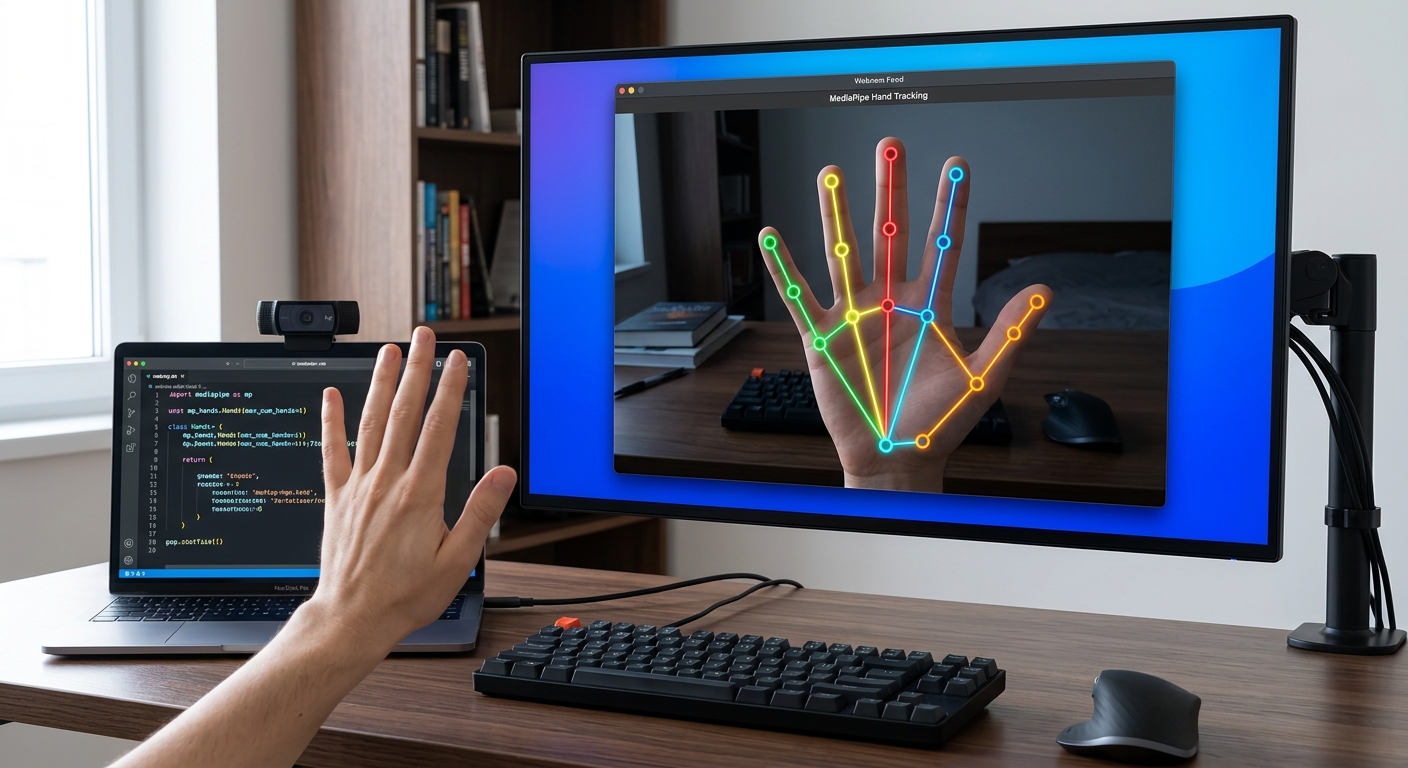
A screenshot of a hand on a webcam feed with brightly colored Mediapipe digital nodes and connecting lines overlaid on the fingers.
Update your code to include the MediaPipe initializations and processing logic:
🧠 Expert Insight: Why BGR to RGB?
OpenCV was developed decades ago when BGR (Blue-Green-Red) was the standard camera color format. MediaPipe, being a modern Google library, expects standard RGB (Red-Green-Blue). If we skipcv2.cvtColor, the AI looks at distorted colors and fails to accurately detect skin tones!When you run this code, your webcam feed will overlay a futuristic, brightly colored wireframe skeleton precisely over your hand.
---
Step 3: Creating the Gesture Recognition AI Brain
Parents looking for AI classes for kids in Zirakpur are always amazed when they see children write algorithms that classify live data. Now, we will map out mathematical logic to determine if your hand shape is a Rock, Paper, or Scissors.
MediaPipe tracks 21 points on your hand. By comparing the Y-coordinates (height) of your fingertips to the joints below them, we can tell if a finger is open or closed.
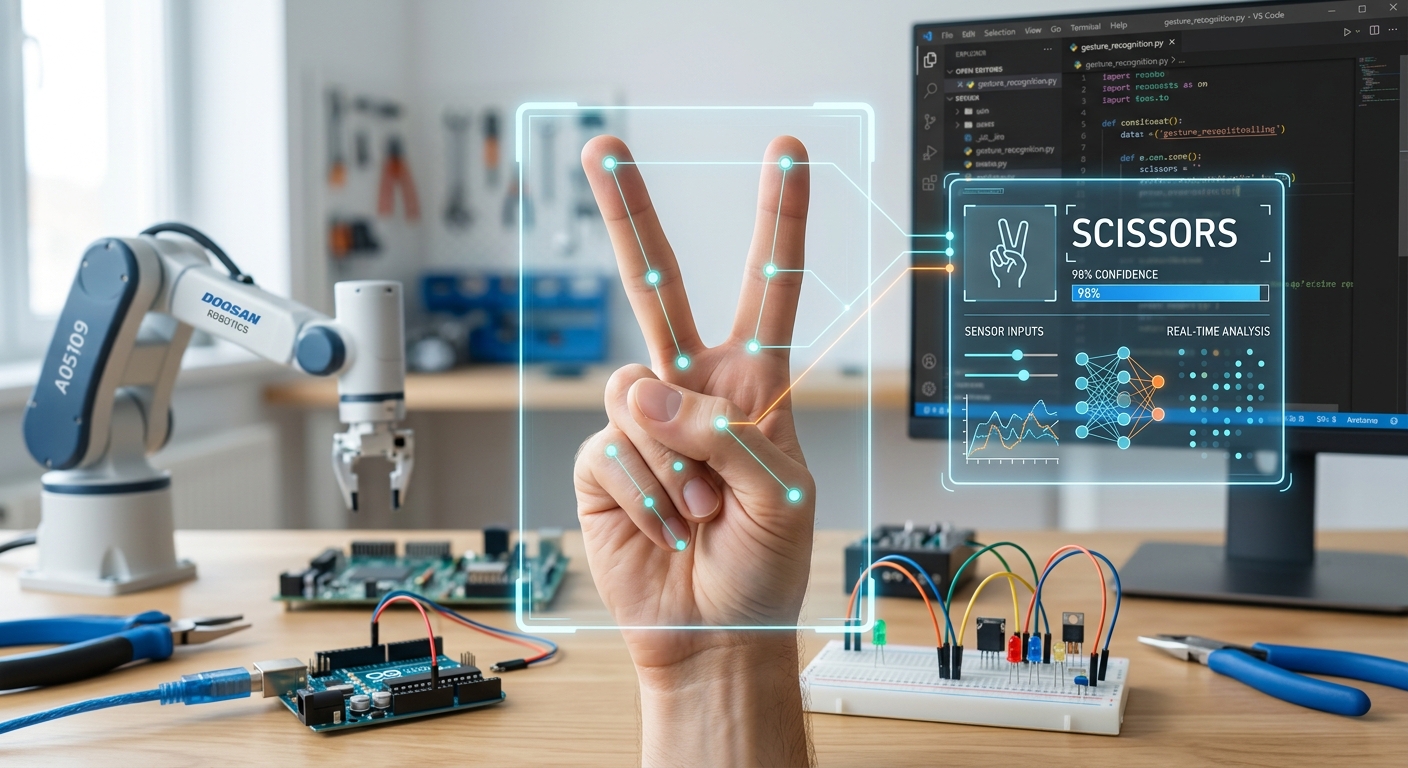
A close-up diagram or screenshot showing a hand making a 'Scissors' gesture with an AI overlay classifying it as Scissors.
Add this function ABOVE your while loop:
Note: We intentionally exclude the thumb in this beginner logic because the thumb joints move horizontally rather than vertically, which requires slightly more complex X-axis math.
---
Step 4: Building the Game Logic
Incorporating gamification is a core pillar of STEM education in the Tricity at AI Valley. We need to add rules. When the user presses the 's' key, the AI will lock in your current gesture, pick its own random move, and apply classic Rock-Paper-Scissors rules to decide who wins.
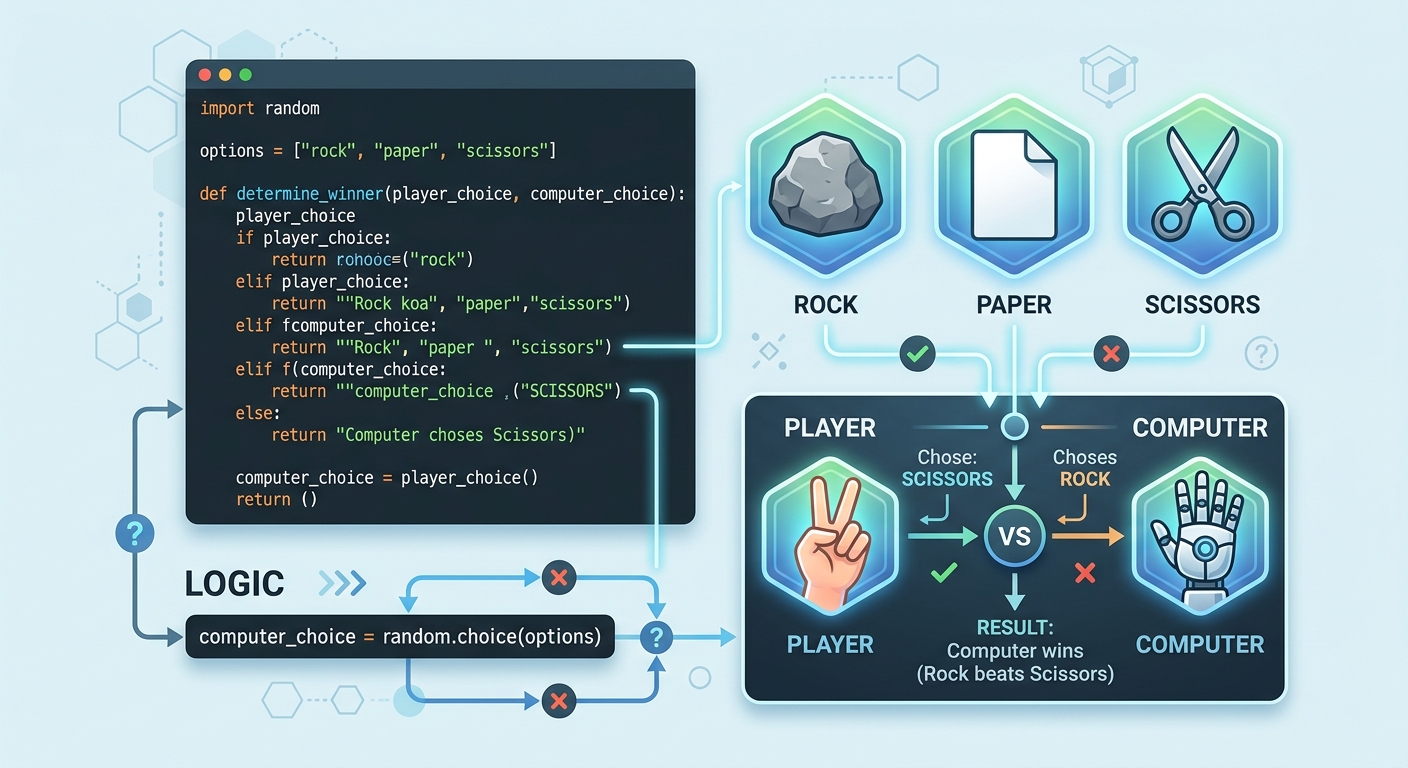
A visual representation showing game logic: a Python code snippet alongside icons of rock, paper, and scissors.
To do this, we import Python's built-in random module. We also create state variables (like user_score and comp_score) to remember the score across the infinite video loop.
(See the next step for how this integrates into the final code).
---
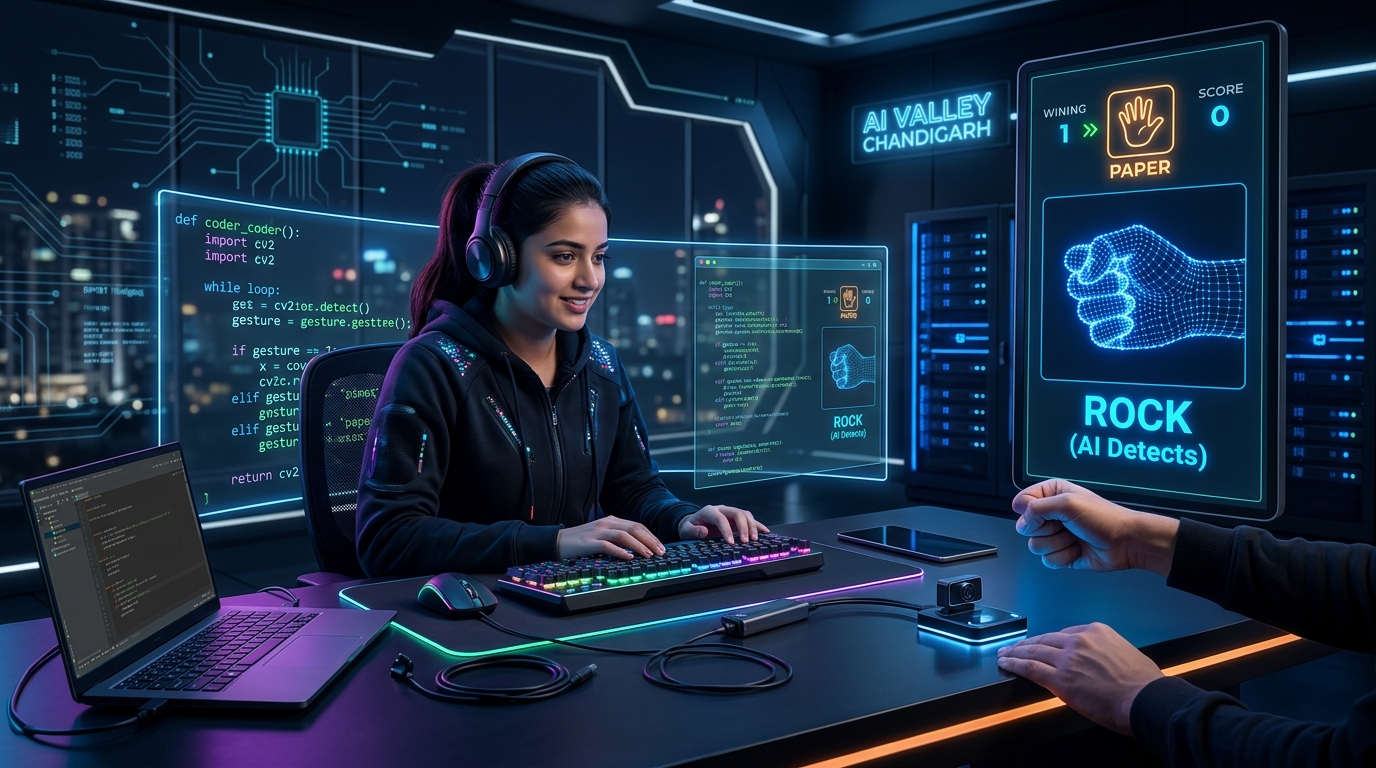
Step 5: The Final Assembled Code with Visual UI
A project isn't finished until it looks great and has an intuitive User Interface (UI). Let's assemble all our steps and use OpenCV to draw a sleek black background box with dynamically updating text so you can track the battle in real-time.
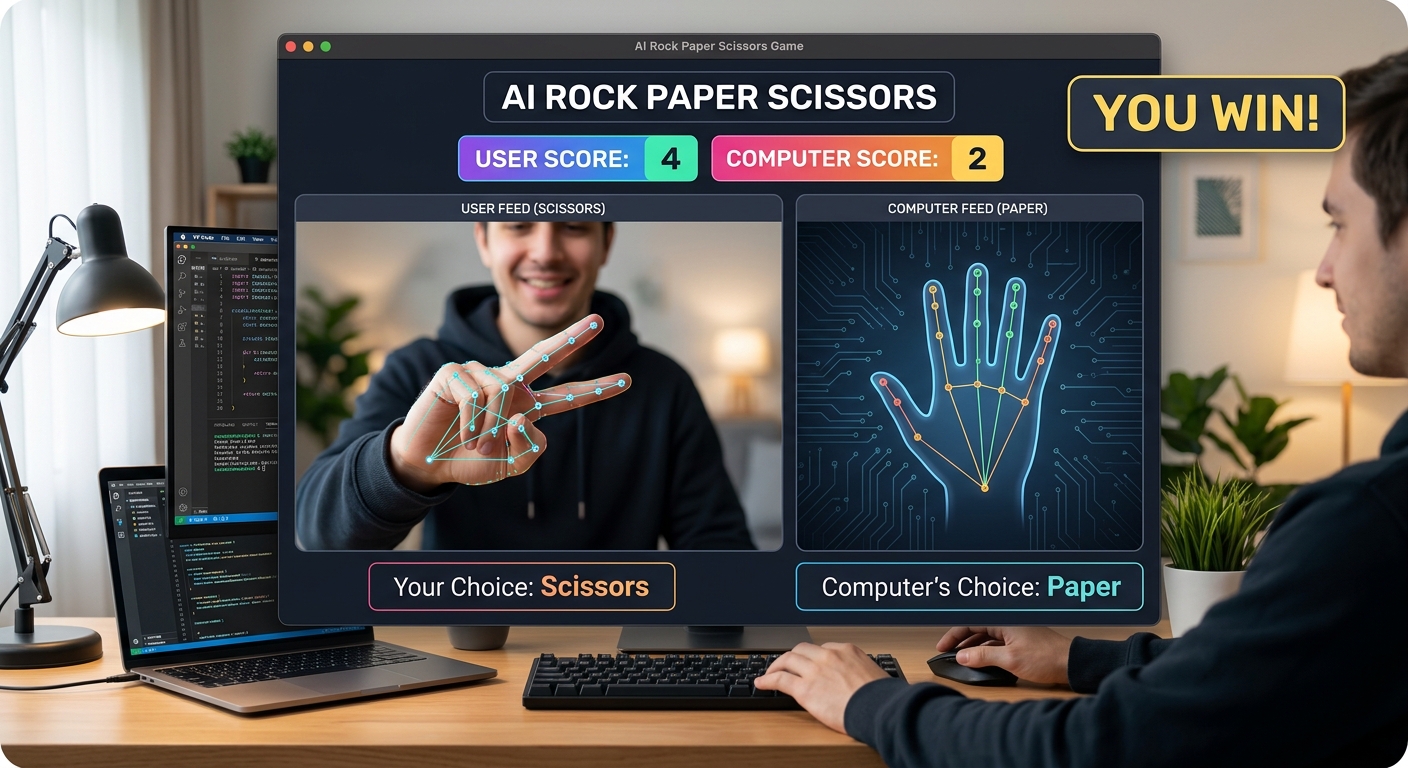
A complete screenshot of the working AI Rock Paper Scissors game showing the webcam feed, the digital hand landmarks, user score, computer score, and a 'You Win!' text overlay.
Here is your complete, final Python script:
---
🛠️ Common Errors & Troubleshooting
As any experienced developer knows, debugging is part of the fun! If you run into issues, check these common fixes:
cv2.VideoCapture(0) to cv2.VideoCapture(1) if you have multiple cameras plugged in.pip install opencv-python mediapipe in the exact same Python environment or virtual environment where your code editor is running.---
🚀 Challenge: Take It Further
Ready for an upgrade? Try adding these features to your code:
pygame library to play a cheering sound when you win, and a buzzer when you lose.time library.---
🏫 Learn More and Enroll at AI Valley
Congratulations! You have just built a robust Computer Vision and Artificial Intelligence program from scratch. By writing this code, you've mastered real-time video capture, landmark tracking, conditional game logic, and dynamic user interfaces. These are the exact programming foundations required to build self-driving cars, facial recognition software, and advanced robotics systems.
AI Valley is proudly recognized as the top tech education and robotics hub across Zirakpur, Chandigarh, Mohali, and Panchkula. We specialize in transforming passive consumers of technology into active, brilliant creators. Our expert instructors teach hands-on, highly engaging projects just like this AI game every single week in our cutting-edge labs.
Whether you are searching for the best coding classes for kids in Panchkula, engaging Python bootcamps in Mohali, or advanced Machine Learning courses for teens in Zirakpur and Chandigarh, we have the perfect learning path waiting for you.
Ready to start building the future? Enroll at AI Valley and visit [aivalley.co.in](https://aivalley.co.in) today to book a free trial class!