
Build a Classic Snake Game: Step-by-Step JavaScript Tutorial | AI Valley Chandigarh
Welcome to the latest hands-on tutorial from AI Valley, the top-rated tech education and robotics hub in Zirakpur and the wider Tricity area. We believe that the best way to master programming is by building projects you actually love playing. If you have been searching for the "best coding classes for kids in Chandigarh" or looking to kickstart your own adult web development journey, you are in exactly the right place!
Today, we are going to build the iconic retro Snake Game entirely from scratch using HTML, CSS, and Vanilla JavaScript. This is the exact kind of foundational project that drives STEM education across the Tricity, helping students practically grasp logic, screen coordinates, and game loops. Let's dive in!
🎯 What You'll Build & Why It Matters
You will build a fully playable, browser-based Snake game. You will control a snake using your keyboard, eat food to grow longer, and keep track of your score. The game ends if you hit the screen boundaries or bite your own tail.
At AI Valley, students in our weekend coding classes regularly build projects like this because it perfectly combines the Trifecta of Web Development:
📋 Prerequisites & Materials
To build this game, you don't need any expensive software or high-end computers. All you need is:
Note: If you prefer learning in a fully equipped, mentor-led environment, you can join our interactive, in-person sessions at AI Valley's state-of-the-art labs.
---
Step 1: Setting Up the HTML Foundation
Every web-based game needs a canvas to draw on. In HTML5, we use the literal element. Think of it as a blank piece of digital paper where JavaScript will draw our snake and food.
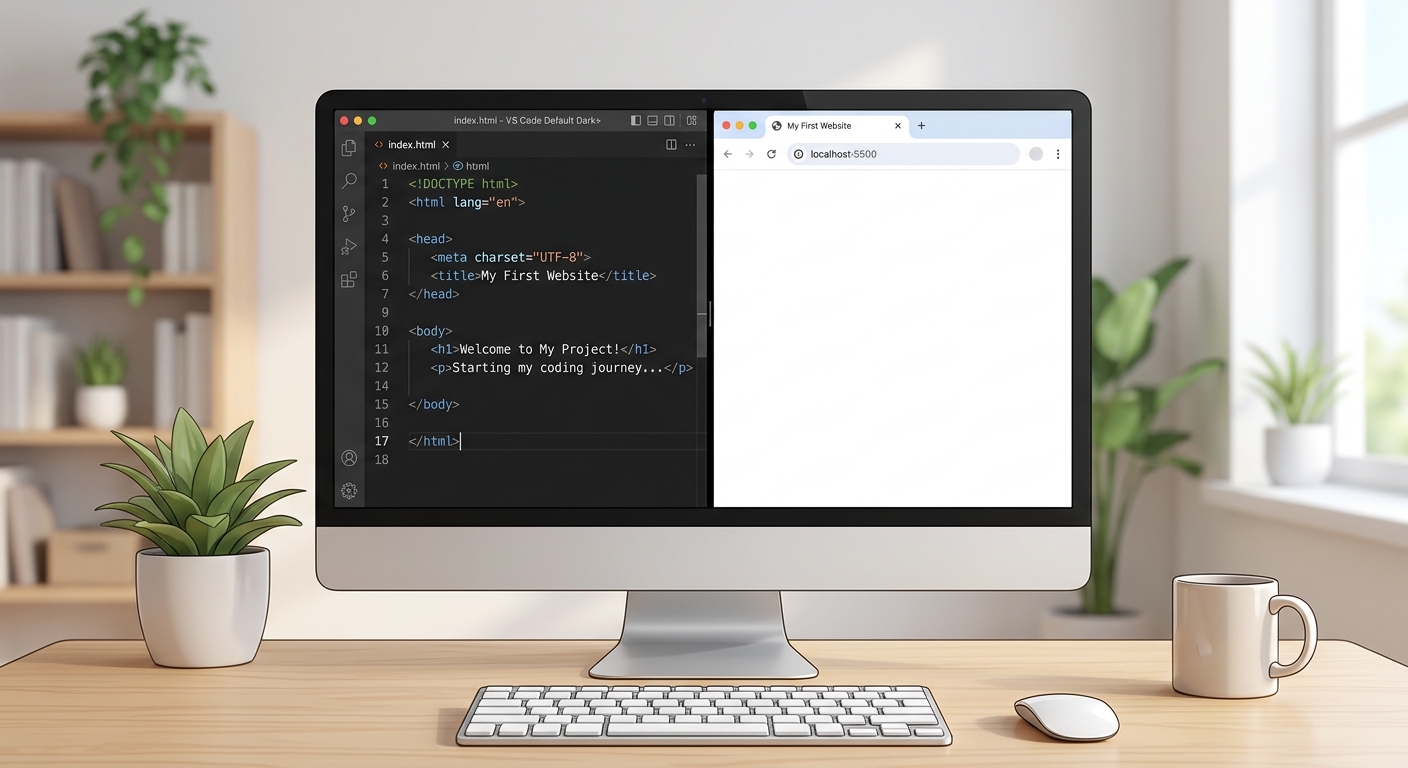
A screenshot of a blank HTML file setup in VS Code showing the boilerplate code and the canvas element.
Create a new folder on your computer called SnakeGame. Inside it, create a file named index.html and paste the following code:
Understanding the Code:
This sets up the essential structure of our web page. We include a main heading, a score display, and the most critical part: . This creates a 400x400 pixel square where our game will live. We also link our CSS and JavaScript files, which we will create in the next steps.
Expected Output: If you open index.html in your browser right now, you will just see the text "AI Valley Snake Game" and "Score: 0" on a plain white background.
---
Step 2: Styling the Game Board with CSS
At our popular web development courses in Mohali, we teach students that a game doesn't just need to work well—it needs to look immersive. Let's add some retro arcade styling.
A screenshot of the web browser showing a dark, centered arcade-style game board with a neon green header.
Create a file named style.css in the same folder and add this code:
Understanding the Code:
We use modern CSS Flexbox (display: flex; justify-content: center; align-items: center;) on the body to perfectly center our game on your screen, taking up the full viewport height (100vh). We give the background a dark slate color and make the game canvas completely black with a neon green border (#2ecc71) to replicate that classic 90s arcade aesthetic.
Expected Output: Refresh your browser. You should now see a dark background, centered green text, and a distinct black square box with a glowing green border.
---
Step 3: Initializing JavaScript & Drawing the Snake
Now comes the brain of the game. We will use JavaScript to define our snake. The snake is basically a collection of coordinates (X and Y) on our HTML canvas. Fun fact: In canvas coordinates, (0,0) is the top-left corner, not the bottom-left!
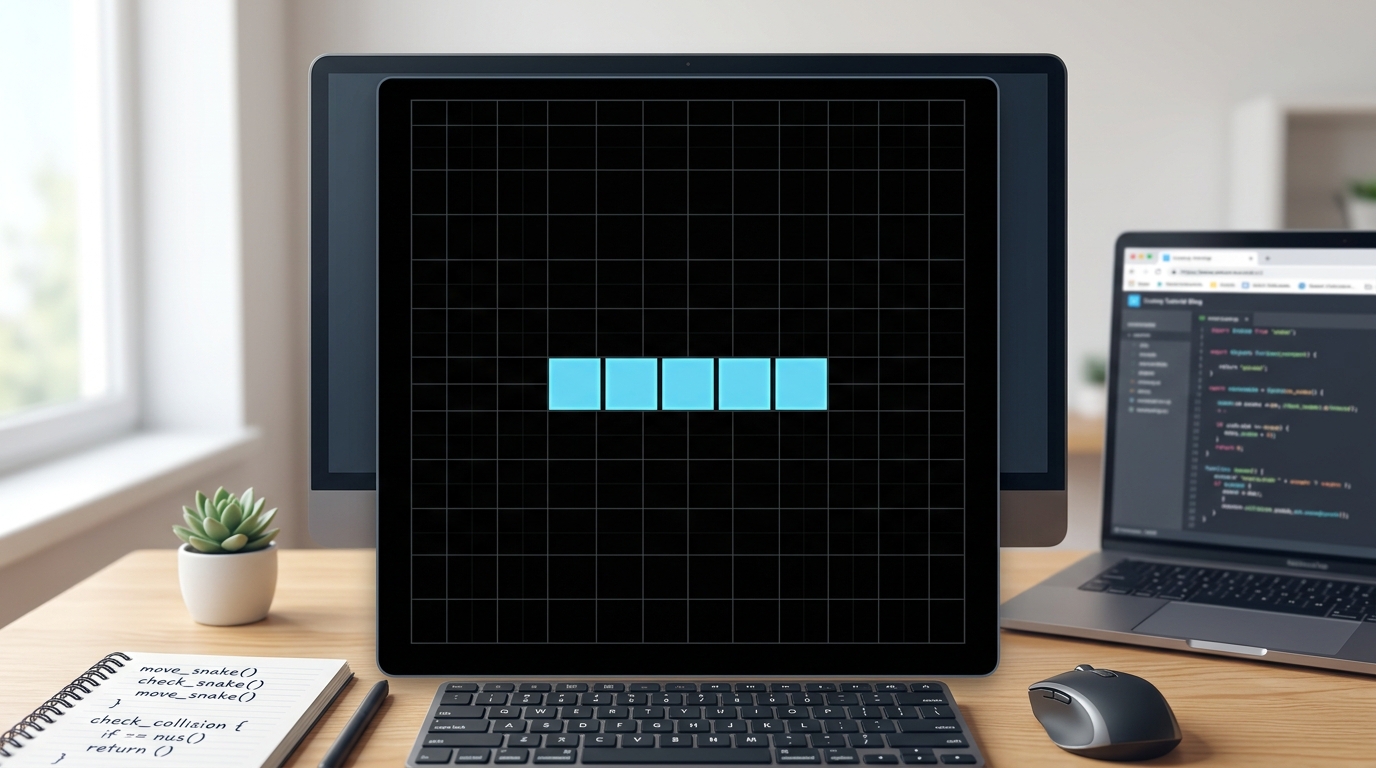
A screenshot showing a static light-blue snake made of 5 square blocks drawn in the center of the black canvas.
Create a file named script.js and add the following initialization code:
Understanding the Code:
First, we grab the element and its 2d drawing context. We represent the snake as an Array of coordinates. Each object {x, y} is a single 10x10 pixel segment of the snake. The drawSnakePart function colors a square at a given coordinate. The drawSnake function uses .forEach() to loop through our entire array, drawing the whole snake on the screen.
Expected Output: Refresh the browser. Inside your black box, you should now see a static, blue, 5-block long snake sitting right in the middle.
---
Step 4: Making the Snake Move
To make the snake move, we need to add a new "head" to the front of the snake in the direction it's traveling, and remove the "tail" at the back. Kids in our programming bootcamps love this step because it visually brings array manipulation (math) to life!
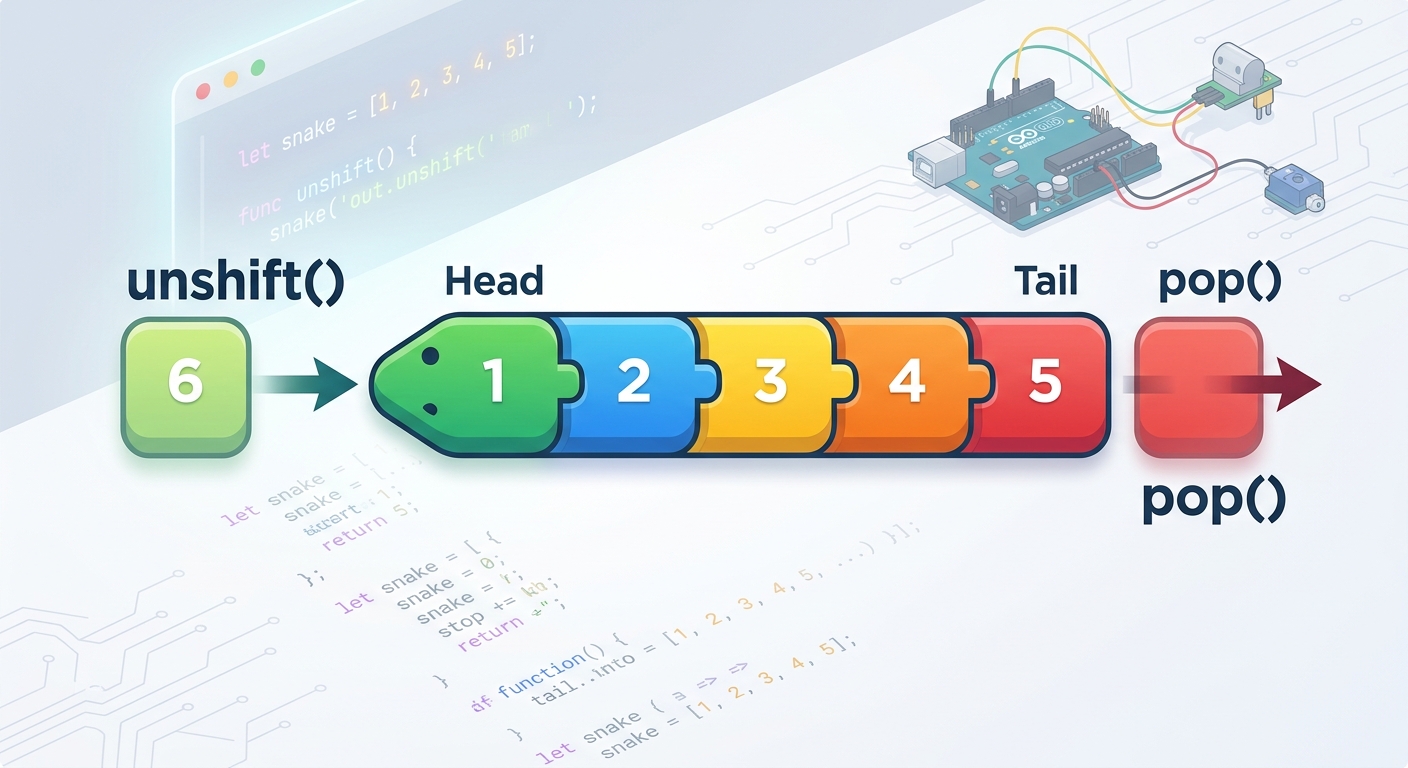
A visual diagram illustrating the 'unshift' method adding a new head block, and the 'pop' method removing the tail block to simulate movement.
Add this code to your script.js file:
Understanding the Code:
dx stands for "delta x" (change in x-axis). Setting dx = 10 means the snake moves right by 10 pixels every frame.
snake.unshift(head) adds a new block to the front of the array, and snake.pop() removes the last block. When done rapidly inside the main() function's setTimeout loop, it creates the illusion of smooth, continuous animation!
---
Step 5: Implementing Keyboard Controls
When parents search for the best coding classes for kids in Panchkula, they often want interactive, visual results that keep students engaged. Controlling a character on screen provides exactly that spark of excitement!
Let's map our arrow keys to control the snake's direction. We will use the modern event.key property for best practices.
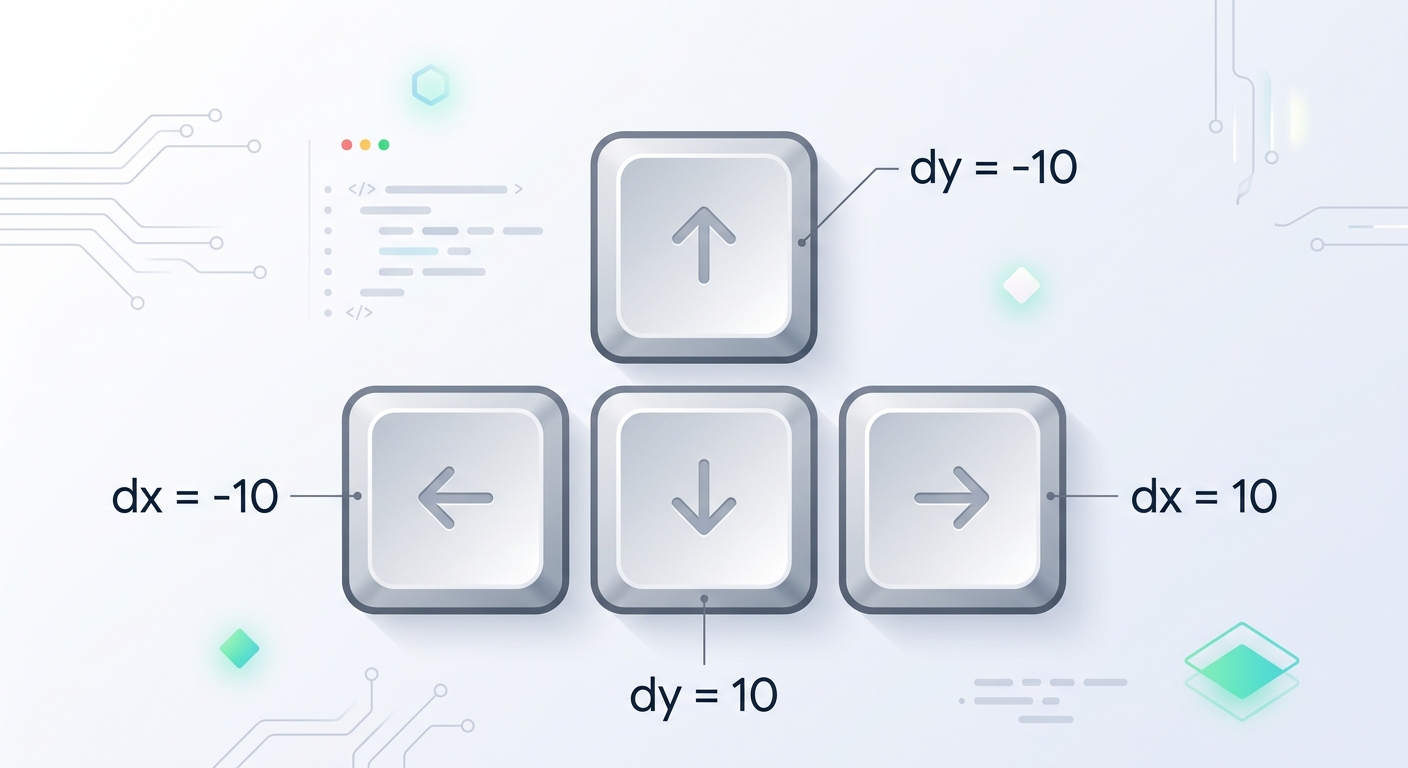
A graphic showing keyboard arrow keys mapped to changing dx and dy variables.
Add this to your script.js:
Understanding the Code:
We listen for the keydown event. Depending on which arrow key is pressed, we change dx and dy. Crucially, we add logic like !goingRight when pressing the Left key. This prevents the "suicide bug" where the snake instantly reverses into its own neck. The changingDirection variable acts as a lock to prevent players from rapidly pressing two keys in a single frame.
---
Step 6: Generating Food, Scoring & Game Over Logic
A game isn't a game without an objective! We need apples (food) for the snake to eat, a score tracker, and boundary checks so the game ends if we crash.
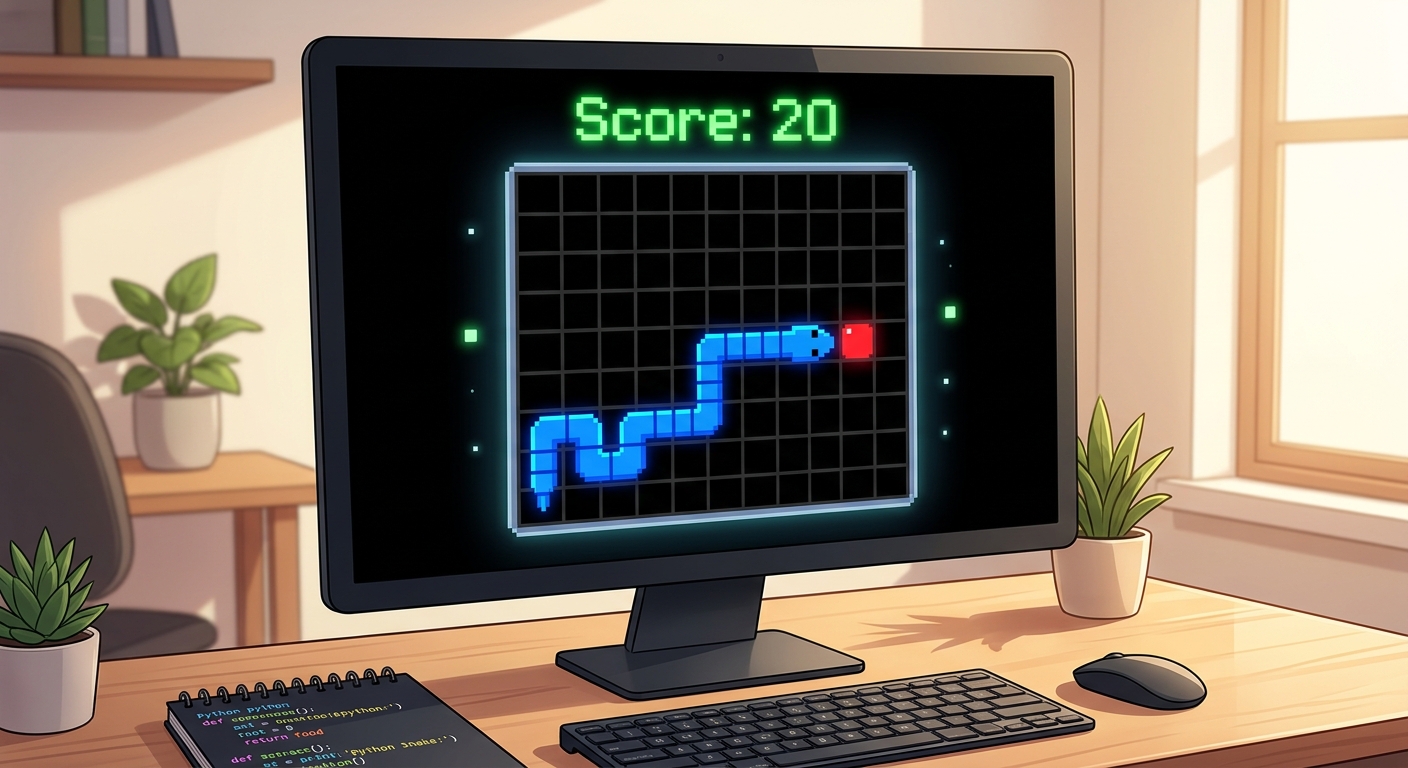
A screenshot of the final working game showing the blue snake eating a red food block.
Update your script.js with these final additions. (To ensure you have everything perfectly assembled, we have provided the complete, final code block below.)
The Final, Complete script.js File:
If you got lost in the steps above, just replace your entire script.js with this complete, working version:Understanding the Final Logic:
createFood() uses Math.floor(Math.random() (canvas.width / 10)) 10 to perfectly snap a red square onto our 10px grid. advanceSnake(), if the new head coordinate matches the food coordinate, we increase the score and do not execute .pop(). This elegantly makes the snake grow longer by 1 block!checkGameOver() tests if the head coordinates have gone past the canvas boundaries, or if it collided with its own body (starting the loop at i = 4 because it's physically impossible for the first 3 joints to touch the head).Expected Output: A fully functioning game! You can drive around, eat the red food, watch your snake grow, see the score update, and receive a "Game Over" alert when you crash.
---
🎉 Final Result & Challenges
Congratulations! You have just coded a classic Snake Game entirely from scratch. Through this project, you have mastered fundamental programming concepts like HTML5 Canvas rendering, CSS Flexbox styling, JavaScript Arrays, Event Listeners, and Game Loops. These are the exact skills used by professional software engineers every day.
Challenge: Take It Further At AI Valley, we don't just stop at the basics. In our advanced classes, students take this framework further by:
setTimeout interval decrease (making the game faster) every time the score increases by 50.checkGameOver() function so that instead of dying when hitting a wall, the snake appears on the opposite side of the screen!🏫 Learn More at AI Valley
AI Valley is proud to be the premier destination for technology education, highly regarded as the best robotics and coding institute in the Tricity. Whether you reside in Chandigarh, Mohali, Panchkula, or Zirakpur, we have a customized curriculum perfectly suited for your goals.
From mastering JavaScript web development and Python, to engaging in the best coding classes for kids in Chandigarh, we provide top-tier, hands-on training for all ages. Don't just play video games—learn to build them!
Visit aivalley.co.in to Enroll at AI Valley today and turn your tech dreams into a reality.