
Build a Smart Plant Watering System: Step-by-Step Arduino Tutorial | AI Valley
Welcome to another exciting, hands-on hardware project from AI Valley! If you're searching for the best coding classes for kids in Zirakpur or the wider Tricity area, you know that we believe in learning by doing. Today, our expert instructors are sharing a step-by-step guide to building an automated Smart Plant Watering System using an Arduino. Whether you are a young innovator looking to build your first robot, or an adult diving into electronics, this beginner-friendly tutorial will transform you into a true engineer. You'll never have to worry about forgetting to water your desk plant again!
🎯 What You'll Build
You are going to build a smart, automated hardware system that acts as a robotic gardener. Using a soil moisture sensor, an Arduino Uno microcontroller (the "brain"), and a miniature water pump, this system will constantly monitor the soil of your favorite indoor plant. When the soil gets too dry, the Arduino will automatically trigger the pump to give the plant a drink!
This is exactly the kind of practical, problem-solving project our students in Mohali, Chandigarh, and Panchkula build during their weekend robotics and Internet of Things (IoT) classes. It combines hardware wiring, software programming, and real-world engineering.
📋 Prerequisites & Materials
To build this smart agriculture system, you will need some specific hardware and software. If you don't have these parts at home, don't worry! Visit the AI Valley hardware lab where all necessary electronics and materials are provided for our enrolled students.
Hardware Required:
Software Required:
---
🚀 Step-by-Step Tutorial
Step 1: Understanding and Wiring the Soil Moisture Sensor
Before we write any code, we need to understand how our robot "feels" the soil. The soil moisture sensor works by passing a small electrical current between its two metal prongs. Because water conducts electricity, wet soil has low electrical resistance, while dry soil has high resistance. The Arduino's Analog-to-Digital Converter (ADC) reads this resistance as a number between 0 and 1023.
Let's wire it up!
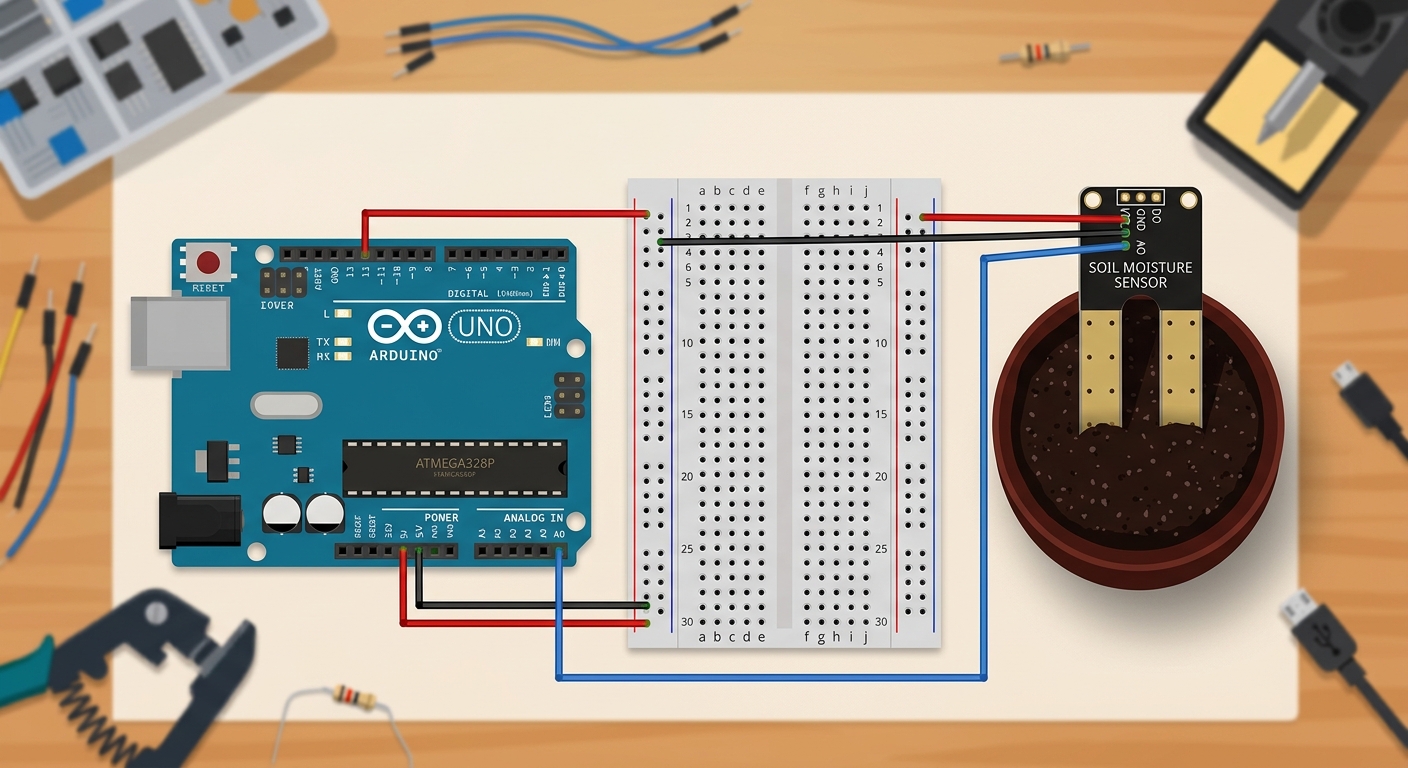
A top-down Fritzing diagram showing an Arduino Uno connected to a soil moisture sensor via a breadboard, with wires clearly going to the 5V, GND, and A0 pins.
Wiring Instructions:
The Code:
What this code does:
We define A0 as our analog sensor pin. In the setup() function, we open a serial communication line to our computer. In the loop(), the Arduino takes a reading using analogRead() every single second and prints it to our screen.
Expected Output: Run this code and open the Serial Monitor (the magnifying glass icon in the top right of the Arduino IDE). If the sensor is sitting in dry air, you'll see a high number (usually around 900–1023). If you dip the prongs into a cup of tap water, the number will drop significantly (around 300–400). Note: Lower numbers mean wetter conditions!
Step 2: Wiring the Relay and Water Pump
An Arduino pin can only output a tiny amount of electrical current—about 40 milliamps. That's enough to light up a tiny LED, but nowhere near enough to run a motorized water pump! To solve this, we use a Relay Module.
A relay contains an electromagnet. When the Arduino sends a tiny signal to the relay, the electromagnet physically pulls a mechanical switch closed, allowing power from a bigger battery to flow to the pump.
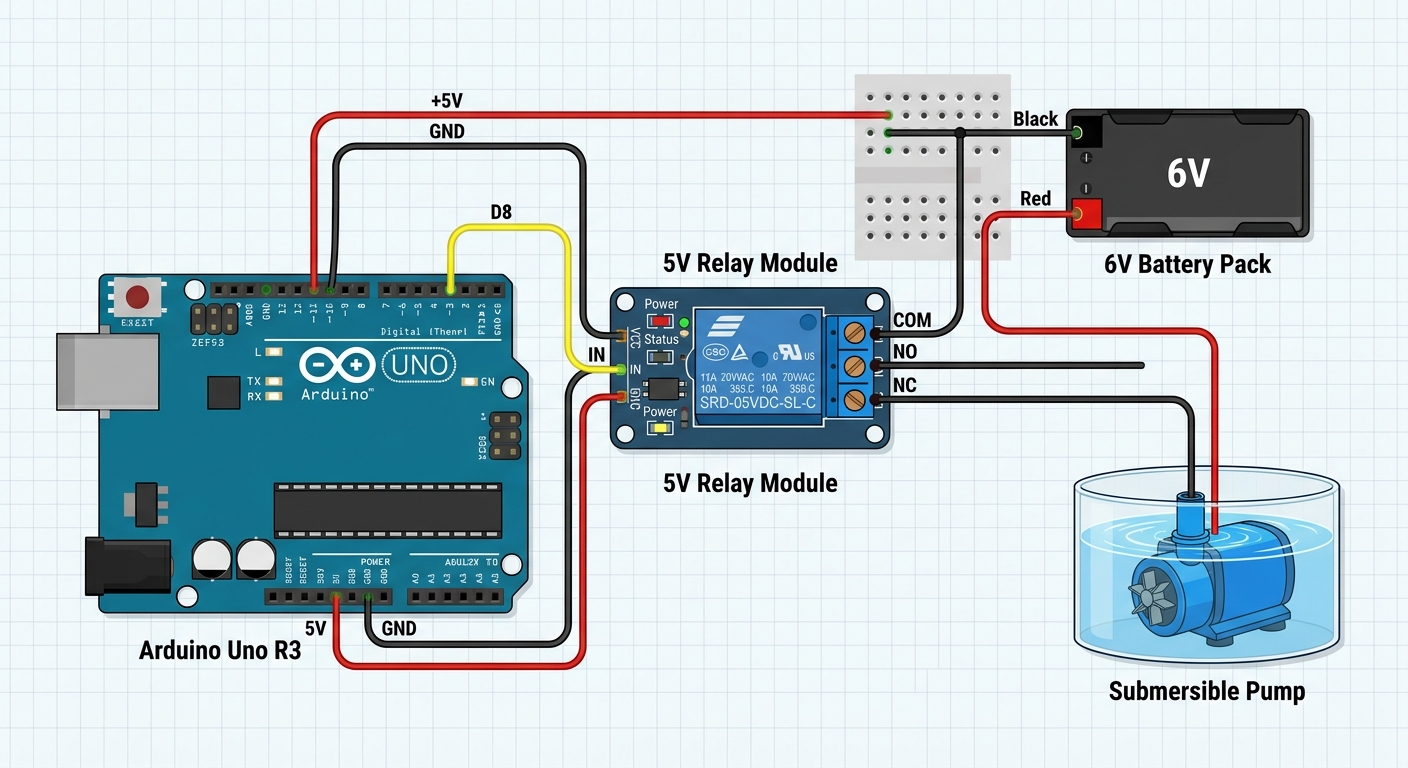
A wiring schematic showing the Arduino connected to a 5V relay module on Pin 8, and the relay acting as a switch between an external battery and the mini water pump.
Wiring Instructions:
The Code:
What this code does:
We've introduced pumpRelayPin on Digital Pin 8. We use pinMode() to tell the Arduino this pin will send electricity OUT. We also set it to HIGH immediately. Expert Tip: Many 5V relay modules are "Active Low." This means sending a LOW signal turns them ON, and a HIGH signal turns them OFF. We want the pump safely turned off by default!
Step 3: Determining the Moisture Threshold
To make our system "smart", it needs to know the difference between "wet enough" and "dangerously dry". Finding this threshold is a practical science experiment.
The Code:
What this code does:
We created a constant integer called dryThreshold and set it to 750. The Arduino checks if the currentMoisture is greater than 750 using a fundamental programming concept: the if/else statement. Test this by sticking your sensor into dry soil, and then freshly watered soil, noting the numbers on your Serial Monitor. If your dry soil reads 800 and your wet soil reads 400, a threshold of 700 or 750 is perfect!
Step 4: Adding the Automated Watering Logic
Now, let's connect the brain to the muscle! We will program the Arduino to automatically turn on the water pump when the dry threshold is crossed, give the plant a measured dose of water, and then wait for the water to soak in.
The Code:
What this code does:
When the soil gets too dry, we send a LOW signal to Pin 8. This triggers the relay, completing the high-power circuit, and the water pump turns on! We keep it running for exactly 3 seconds using delay(3000). Crucially, we turn it back off and add a 10-second delay afterward. This allows the water to seep deep into the soil and reach the sensor prongs. Without this delay, the Arduino would instantly check the soil again, think it was still dry, and keep pumping until your desk is flooded!
Step 5: Finalizing and Deploying Your Robot Gardener
The final step is to disconnect your Arduino from the computer so it can run independently.
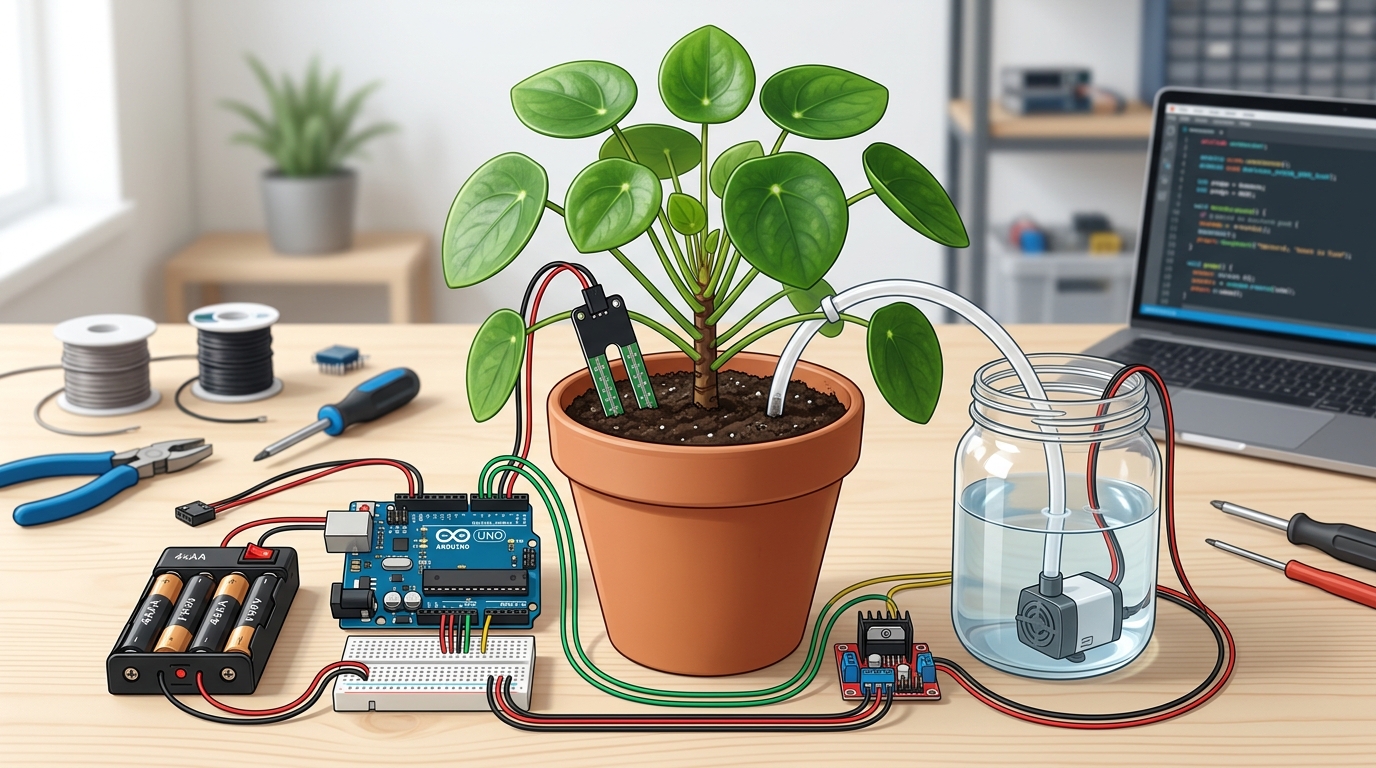
A wide shot of the completed project. A healthy green plant in a pot with the sensor pushed into the dirt, a small water reservoir nearby with the pump inside, all wired neatly to the Arduino and battery pack.
Deployment Instructions:
---
🛠️ Common Troubleshooting & Expert Tips
Building hardware doesn't always go perfectly on the first try. If you are having issues, check these common fixes:
- The pump runs continuously and never stops! You likely have an Active High relay instead of an Active Low one. Swap your
- My sensor rusted and stopped working after a few weeks! Leaving a constant electrical current running through metal prongs in wet soil causes a chemical reaction called electrolysis, which eats away the metal. Pro-Tip: Instead of plugging the sensor's VCC into the Arduino's 5V pin, plug it into a spare Digital Pin (like Pin 7). Update your code to turn Pin 7
digitalWrite(pumpRelayPin, LOW) to HIGH in your watering block, and vice-versa.
HIGH right before reading the moisture, and turn it LOW immediately after. This drastically extends the life of your sensor!🚀 Challenge: Take It Further
Want to upgrade your system? Here are three ways to take it to the next level:
---
🏫 Learn More at AI Valley
Did you enjoy this project? AI Valley is the top-rated technology and robotics training center proudly serving students across Chandigarh, Mohali, Panchkula, and Zirakpur. We believe that theory alone isn't enough—our expert instructors guide students through hands-on, real-world projects just like this one every single week.
Whether your goal is to learn Python, master full-stack web development, or build sophisticated IoT robots and AI models, we have the perfect curriculum for you. From young beginners exploring tech to older students seeking advanced programming skills, we provide the tools, the cutting-edge labs, and the mentorship required to turn screen time into serious skill time.
If you are looking for the best coding classes for kids in Mohali, or the most comprehensive robotics courses in the Tricity area, your search ends here.
Enroll at AI Valley today and start building the future. Visit [aivalley.co.in](https://aivalley.co.in) to book a free trial class and kickstart your tech journey!